Setup
This page is intended to help you get Viv installed and set up with the necessary prerequisites. It does NOT cover the debug process itself; for that, go back to the main instructions: Viv CLI Instructions
0. Prerequisites
Have the following ready before you start:
-
An x64 Linux machine with glibc version 2.28 or higher.
To ensure that your version of glibc is new enough, run
ldd --version. If it is older than 2.28, it's generally possible to run a container with a newer version. -
A way of getting a language model API key for one of the following model families. Either direct access from the model creator's API (e.g. api.openai.com) or a third-party cloud provider (e.g. Azure) are supported.
- Claude
- OpenAI GPT family
- Any model running on an OpenAI-compatible server using chat completions endpoint (e.g. OpenRouter)
- Any model running on a vLLM server
Alternatively, if you have a Claude Code subscription, you can use the local
claudeCLI instead of a separate API key. See Using Claude Code as your provider below.
1. Install Viv
- curl/npm (fastest)
- Tarball
- Docker/Podman
-
Install CLI by running:
curl -fsSL install.silogy.io | bashThis will:
- Install Node.js ≥ 22, if it doesn't exist. Node.js is a JavaScript runtime that Viv is built on.
- Install the CLI tool from https://www.npmjs.com/package/@silogy/viv
If you don't want to run this script, you can also run these steps manually.
-
Run
viv versionto verify installation. Ensure that the Viv version is as expected.
This is applicable if you received a viv.tar.gz installation package containing a minified version of Viv's JavaScript source code. To install:
-
Run
node versionto ensure that Node is installed. The version must be greater thanv18.20.8. If it's not available or an older version, install an up-to-date version or let us know if this isn't possible. -
Extract the tarball in a convenient location.
-
Once you've done this, optionally make sure the extraction worked by
cd-ing into the viv directory and runningtree . -I node_modules(-I node_modulesprevents the hugenode_modulesdirectory from being printed). You should see something like this:viv
├── bin
│ └── viv
├── cli
│ ├── package.json
│ ├── rascal-binaries
│ │ └── aarch64-apple-darwin
│ │ └── rascal
│ └── scripts
│ └── install-rascal.cjs
├── package.json
├── rascal-binaries
│ └── aarch64-apple-darwin
│ └── rascal
├── src
│ └── shared
│ └── package.json
└── yarn.lock
-
-
Inside the newly created
vivdirectory, run:bin/viv --versionand ensure that the Viv version is as expected.
This is applicable if you received a viv-container-image.tar.gz file. This file contains a gzipped container image. To load the image, simply unzip and load it by running:
gzip -d viv-container-image.tar.gz
docker image load -i viv-container-image.tar  # or 'podman ...'
The resulting image will be tagged silogy-viv:[current version number].
2. License and LLM provider credentials setup
Viv requires a Viv license and LLM provider credentials in order to use. The easiest way to get started is to type:
viv
# or path/to/viv if it's not in your $PATH
The first time you run this command, you'll be prompted to set up a Viv license and LLM configuration. Follow the prompts to get started. Here's what it'll look like:
As you can see in the video, the quickstart process sets up a license key and a model provider API key. You'll also be asked to pick a language for user-facing output (English or Korean) — the agent still reasons in English internally, so this only affects the final bug description and fix steps.
For more details on how to set up Viv, or to modify your setup after initially setting it up, see the configuration reference.
For information on default models by provider, as well as instructions on how to set which model is used, see the model configuration reference.
Alternative: use the Claude Code CLI instead of an API key
If you already use Claude Code, you can have Viv drive the agent through your local claude installation instead of managing an API key. Install claude and run claude login once. You can then select Claude Code in the first-run setup picker, or manually set "llm": { "provider": "claudecode" } in ~/.viv/config.json. Either way, no claude-key.txt is required.
During the setup picker, Viv:
- Auto-detects
claudeonPATHand verifies the install is signed in via a minimalclaude -pcall. - Prompts for an explicit path if
claudeis not onPATH, and saves it asllm.claudecode_pathinconfig.json. - Surfaces the
claudeCLI's own error (e.g.Not logged in · Please run /login) if the sign-in check fails, and lets you retry after running/loginin another terminal.
Trade-off: the agent runs with Claude Code's built-in read-only tools (Read, Grep, Glob) rather than Viv's native tool set. For most failing-test workflows this is equivalent; for heavily customized setups the claude provider gives you more control over tools and model selection.
Appendix: How to create an API key
Just to make things easier, here's how you create an API key:
Create an OpenAI API key
If you are using OpenAI:
-
Go to https://auth.openai.com/log-in and sign up.
-
In the upper right of the screen, click on the gear icon to go to Settings.
- If you see "Start building" in the upper right, click on it and fill in your information to create an organization on the OpenAI platform, pressing "I'll do it later" for everything. If you're prompted to create an API key, skip it for now.
-
Ensure you have sufficient credit: in the left panel, under the Organization heading, click Billing. If you don't have at least a few dollars in your account, add some.
-
Also in the left panel under Organization, click on "API keys."
-
Click on "+ Create new secret key."
-
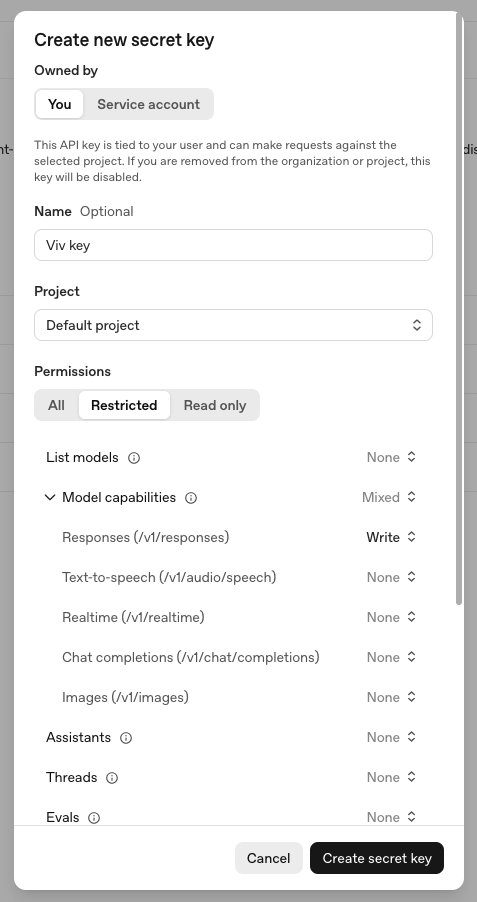
If you are setting up Viv to use interactively, then under "Owned by," select "You." If you intend for Viv to be called by automation such as CI, choose "Service account" instead.
-
Give the key a meaningful name and under "Project" select "Default project."
-
If you chose "Owned by: You" above, set the Permissions to Restricted. Under "Model capabilities," set "Responses (/v1/responses)" to "Write." You do not need to set any other permissions. It should look like this:
-
Press "Create secret key" to view the secret key. Save this key somewhere secure.
Create a Claude API key
If you are using Claude:
- Go to https://platform.claude.com/login and sign up.
- Expand the left hand side panel. Under Manage, click Settings.
- Go the Billing section, add your payment information, and purchase a few dollars' worth of credits.
- Go to the API keys section and click "+ Create key."
- Select the Default workspace and give your key a name.
- Press "Add" to view the secret key. Save this key somewhere secure.